Assets Management System (AMS V 4.5)
(Online & Centralized System)
User Manual
1. Install 2. Login 3. Main Form 4. Menu
5. Shortcut Keys to Remember 6. Icons Identification
1. Install:
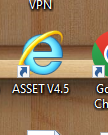
1. Copy the Enternet Explorer shortcut icon to Desktop.
2. Rename it to AMS V4.5
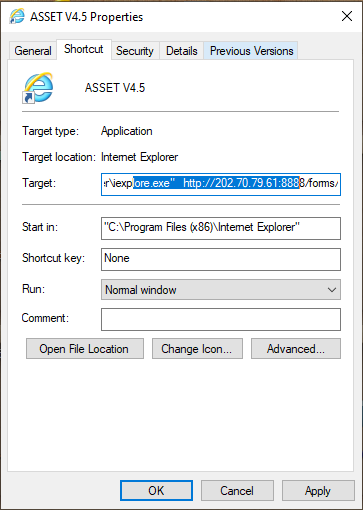
3. Reght click the "AMS V4.5" icon and go to Properties
4. Go to Target and paste the text below at the end after "C:\Program Files (x86)\Internet Explorer\iexplore.exe"
http://202.70.79.61:8888/forms/frmservlet?config=asset&separateFrame=true
5. Press on OK button.
6. Now, Double Click the "AMS V4.5" icon to run the AMS Software.
Now the AMS Software is ready to use.
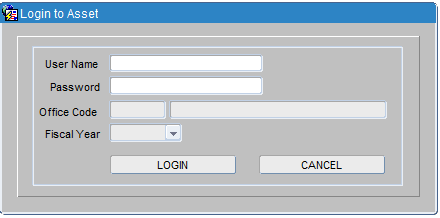
2. Login:
1.
Double Click on AMS icon  in
the desktop to open AMS Software
in
the desktop to open AMS Software
2. Type user name in User Name field and press "Enter Key".
3. Type password in Password field and press "Enter Key".
4. Select the Office in Office field and press "Enter Key".
5. Select Fiscal Year in Fiscal Year Dropdown List.
3. Main Form:
After Successful Login you will able to access the Main Form.
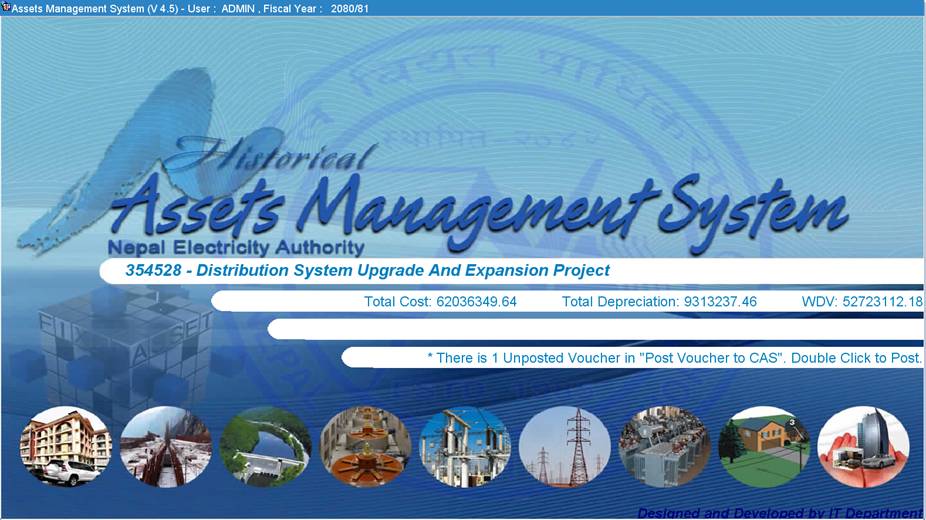
Action, Utility, Setup, Transaction, Reports, Help.
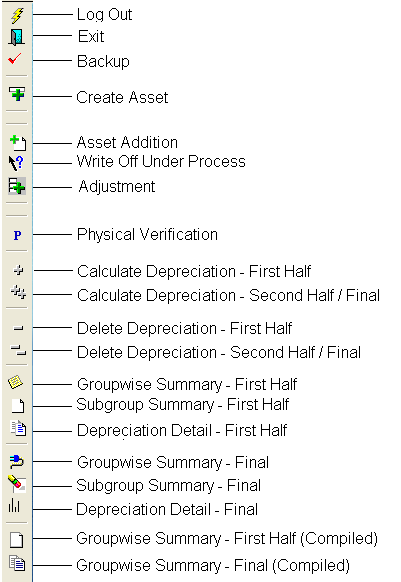
Write Off Under Process
Physical Verification
Depr Expenditure Adjustment
Work Complete Detail
Calculate Depreciation – Calculate First Half
Delete Depreciation – Delete First Half
Report – Data Received – Data Sending Offices
Asset Group Detail – Asset Opening Groupwise
Asset Opening Detail
Asset Group Report
Asset Detail Report
Right Off Under Process Right Off Under Process Summary
Right Off Under Process Detail
Asset Adjustment – Adjustment Detail (Item Wise)
Adjustment Detail (Type Wise)
Transfer Note
Physical Verification
Depreciation – First Half – Depreciation Detail (First Half)
Subgroup Summary (First Half)
Groupwise Summary (First Half)
Voucher Preview (First Half)
CAS vs AMS - (First Half)
Final Dep – Depreciation Detail (Final)
Subgroup Summary (Final)
Groupwise Summary (Final)
Voucher Preview (Final)
CAS vs AMS - (Final)
Compiled Depreciation Report -- Groupwise Summary - First Half- Compiled
Groupwise Summary - Final - Compiled
Total Summary - Final - Compiled
CAS vs AMS Aggregate - Final
CAS vs AMS Summary - Final
CAS vs AMS Detail - Final
Shift + F5 – Copy Cell
Shift + F6 – Copy Row
Ctrl + Down Arrow – Create New Record
F11 – Enter Query (Search)
Ctrl + F11 – Execute Query (Result of the Search)
Ctrl + L – Display List of Value
Ctrl + S – Save
Ctrl + Up Arrow – Delete a record.
Virtical Toolbar
Horizontal Toolbar

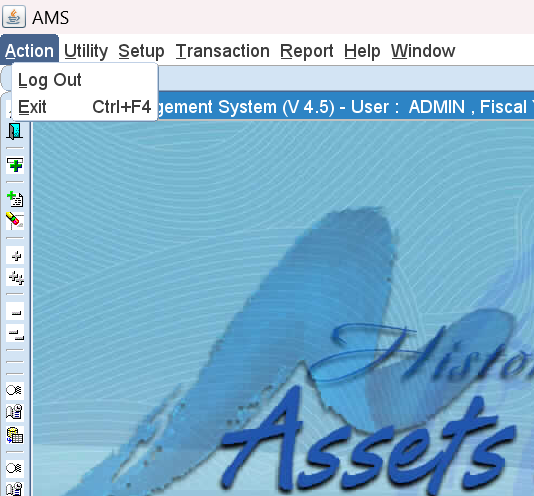
There are Two Sub Menus under Action Menu.
1. Log Out – It will take you to the Login Screen.
2. Exit – It will exit you from AMS.
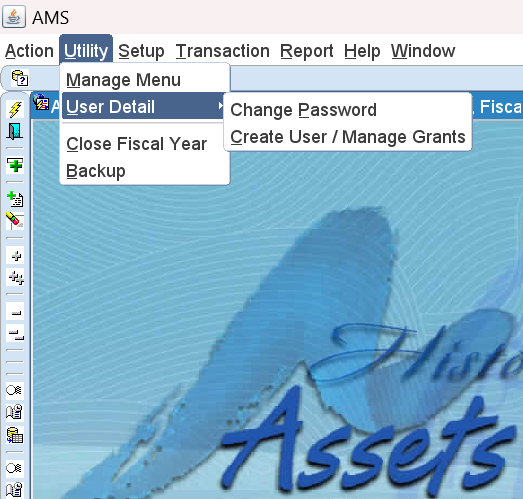
There are several Sub Menus under Utility.
1. Menu Manage – This menu displays the Menu Manage form.
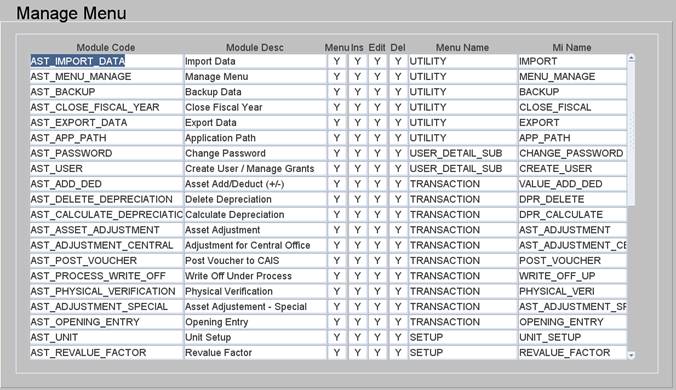
This form is used to manage the menu and its grants to user. This form is only available to Admin level users.
2. User Detail – This Menu contains some Sub Menus.
· Change Password -- This Menu displays Change Password form
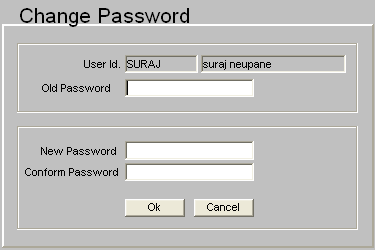
This form is used to change the password of the current user.
Steps. 1 Type old password in Old Password field.
2 Type new password in New Password field.
3 Retype same password as in New Password field.
4 Then click on Ok button.
If you don’t want to change the password then Click on Cancel button.
3. Close Fiscal Year – This Menu displays Close Fiscal Year form.
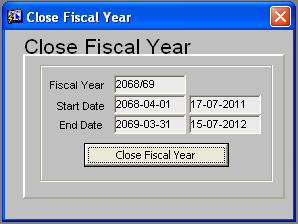
This form is used to close the fiscal year after the calculation of depreciation.
Steps. 1. Click on Close Fiscal Year button.
There are several Sub Menus under Setup.
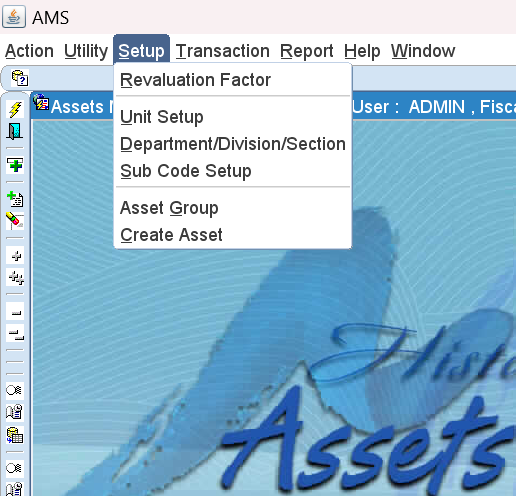
1. Unit Setup – This menu displays the Unit Setup form.
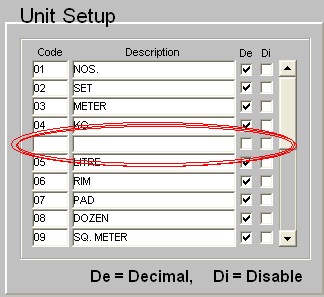
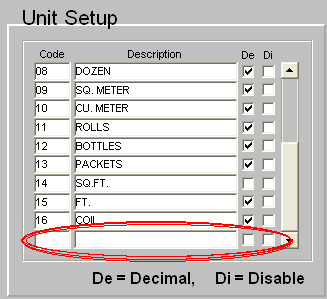
This form is used to set the unit of measurement or the assets (like NOS. for chairs, tables—SET for computers)
Steps to insert new unit First method
1 Press "Ctrl+Down Arrow" key on the keyboard to create new record.
2 Type new number in Code field, type description in Description field.
3 If the Unit of Measurement contains Decimal place then click on De.
Next method
a. Press the Down Arrow Key on the keyboard to go to the last record and then new record.
b. Then follow the step 2.
2. Department/Division/Section – This menu displays the Department/Division/Section form.
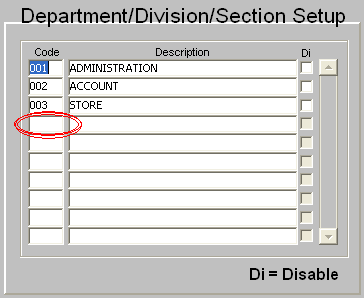
This form is used to set the Department, Divison or Secion Name.
Steps to insert new Department, Division or Section
1 Go to blank space of Code.
2 Type Department Code.
3 Type Department Name in Description field.
4 Press "Ctrl+S" to save the record.
3. Sub Code Setup – This menu displays the Sub Code Setup form.
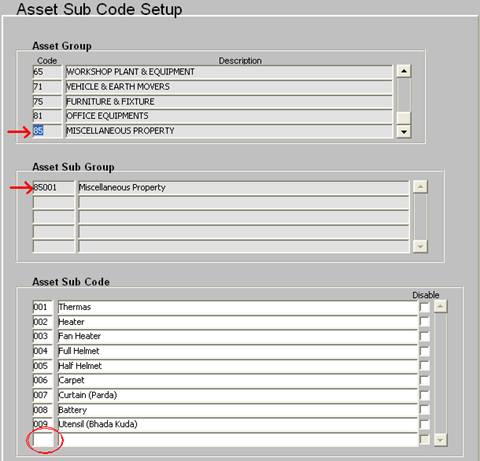
This form is used to set the Sub Code of individual group. It is a kind of grouping of assets created and managed by user. The Asset Sub Code is forther used in the process of creating asset.
Steps to insert new Asset Sub Code
1 Select the required Asset Group by using down arrow key.
2 Select the required Asset Sub Group by using down arrow key.
3 Go to Last line of Asset Sub Code.
4 Type Code no in Code and Group name in Descrition.
5 Press "Ctrl+S" to Save.
4. Create Asset – This menu displays the Create Asset form.
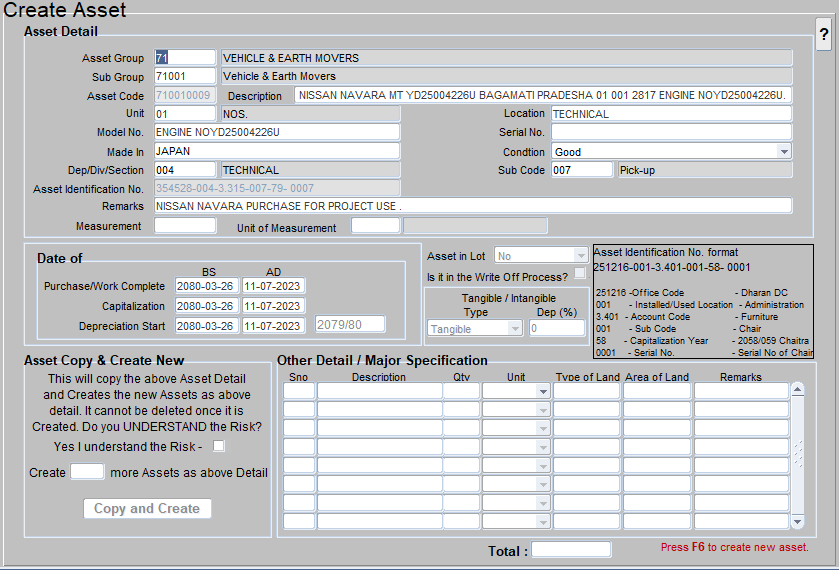
This form is used to set the detail of asset. All the details of asset are entered here. (Like Name of Asset, Which Group it belongs to, Unit of measurement, Location … etc.)
Steps to insert new Asset Detail
1 Press "Ctrl+Down Arrow" key on the keyboard to create new record.
2 Select Asset Group by pressing "Ctrl+L" or double clicking on Asset Group Field.
3 Select Sub Group by pressing "Ctrl+L" or double clicking on Sub Group Field. Then Press Enter Key.
4 Asset Code will generate automatically, then type asset name in the Description field (Like ‘Double Cab Pickup ba1ma 1449).
5 Select Unit pressing "Ctrl+L" or double clicking on Unit Field.
6 Type the location of the Asset in Location Field. (Required)
7 Type the Model number in Model No. Field (if any).
8 Type the Asset Serial Number in Asset Serial No. Field (if any).
9 Select Department where the Asset is being used in Dep/Div/Sec Field
10 Select Sub Code from the list by pressing "Ctrl+L" or double clicking on Sub Code Field (Note: This is Grouping done by user)
11 Type the purchase date or work complete date in the “Date of Purchase/Work Complete” BS & AD
12 Type the capitalization date in the “Date of Capitalization” BS & AD.
13 Type the depreciation start date in the “Date of Depreciation Start” BS & AD.
14 Press "Ctrl+S" to save the record.
Asset Copy and Create New Function:
This Function is used to copy all the detail of above Asset and Create new Asset.
Setps to Copy and Create Asset
1 Create first Asset by following above setps and Save it.
2 Click on "I understand the Risk" Checkbox to activate the Create Button.
3 Type the number of Assets to Create in "Create |_____| more Assets as above Detail" TEXTBOX.
4 Click on Create Button to create the above mentioned number of Assets.
(eg.: If you want to create total 20 Chairs. Then create one by yourself and save it. Now, click on "I understand the Risk" Checkbox then type 19 in Textbox then click on Copy and Create Button. Then, the system will create 1 + 19 = 20 Total Chairs)
Note: If the Asset which is transferred from one branch to other is old Asset, then the Purchase/Capitalized Date must be old Purchase/Capitalized Date.
: Purchase/Capitalized Date is used to calculate Depreciation for the corresponding Fiscal Year.
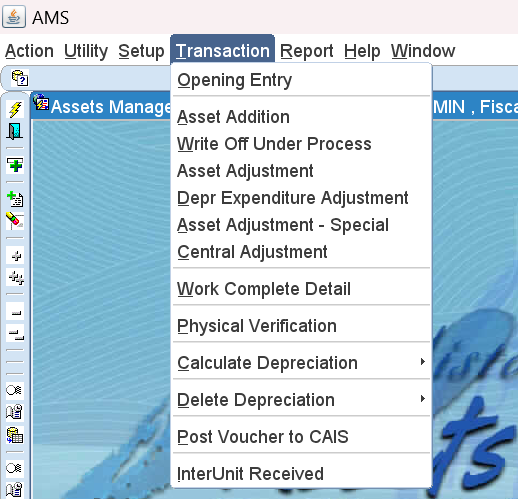
There are several sub menus under Transaction Menu.
1 Opening Entry – This menu displays the Asset Opening Entry form.
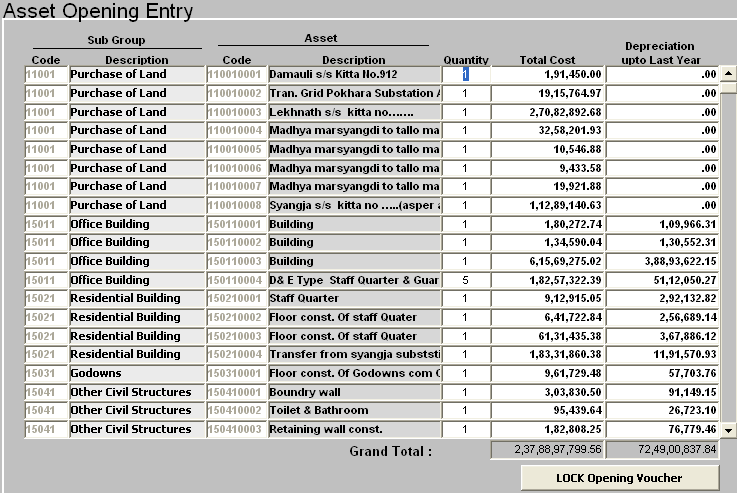
This form is to manage the opening balance of the asset. When Asset detail is created in “Create Asset” in Setup Menu, Asset Code and Asset Description are dragged from “Create Asset” form. Now insert the Opening Quantity, Total Cost, and Depreciation Upto Last Year according to the Closing balance of the Asset Register.
This form is to lock the opening values. Once the Opening is locked it is not possible to Insert, update or delete record from “Opening Entry” form.
Click on ‘LOCK Opening Voucher’ button to Lock the Opening Entry.
2 Asset Addition – This menu displays the Asset Addition form.
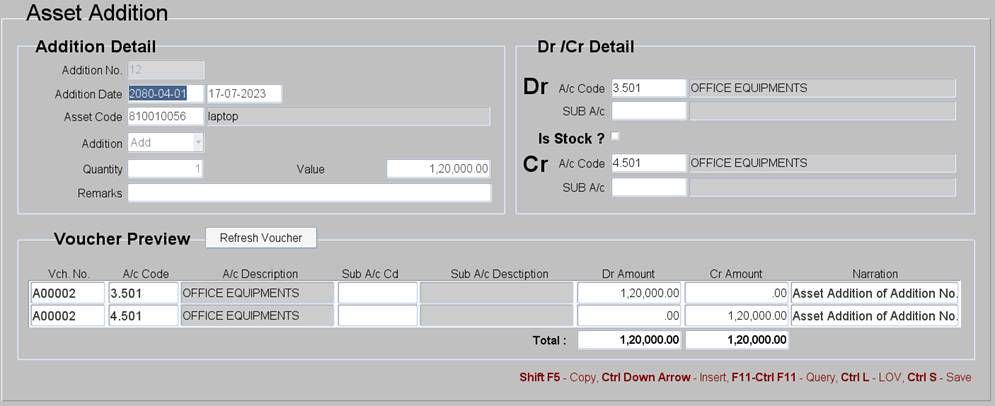
This form is to add the assets that are purchased during the relative fiscal year.
Steps to add a new Asset. (Before going through these steps, go through “Create Asset” under Setup
Menu.)
1 Press "Ctrl+Down Aarrow" key on the keyboard to create new record.
2 Type the addition date in the ‘Addition Date’ field.
3 Select Asset Code by pressing "Ctrl+L" or double clicking on ‘Asset Code’ field.
4 Select Add in ‘Addition’ drop down menu.
5 Type CAIS Voucher Number in ‘CAIS Voucher No.’ field.
6 Insert added quantity in ‘Quantity’ field.
7 Insert added value in ‘Value’ field.
8 Type the Remarks as the requirement.
9 Select Sub Acc Code of Dr/Cr Account if nessecery.
10 Press "Ctrl+S" to save the record.
11 Open the "Post Voucher to CAS" form to post the voucher to CAS (Centralized Accounting System)
Note: If the Asset is transferred from Stock (6.101) directly then, click on "Is Stock ?" to change the Cr A/c Code to 6.101 before setp 10.
3 Asset Adjustment – This menu displays the Asset Adjustment form.
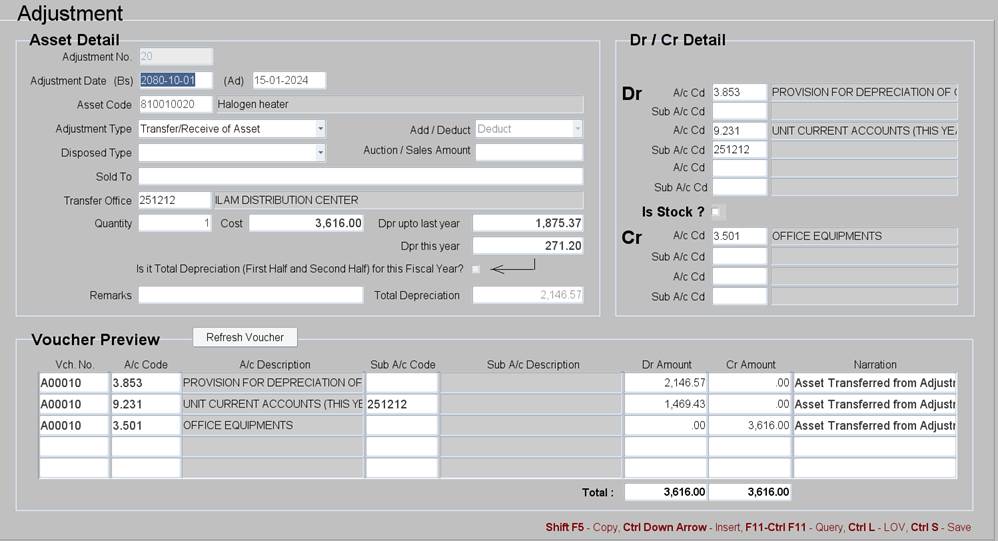
This form is to transfer, dispose, sales of asset during the relative fiscal year.
There are four types of adjustment in this form. They are
i. Adjustment
ii. Sales of Asset/Auction
iii. Transfer of Asset
iv. Dispose/ Write off
Sales of Asset/Auction:
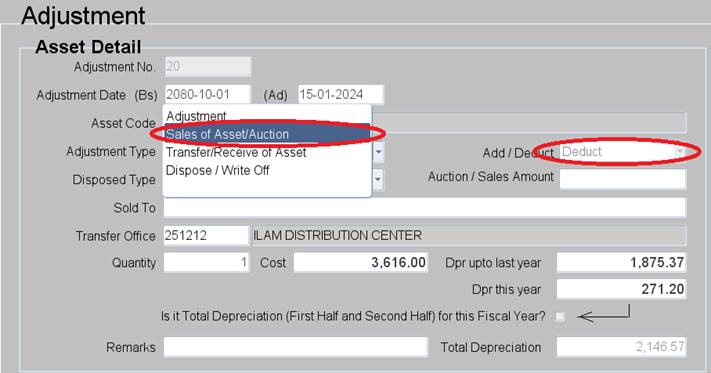
Steps
1. Press "Ctrl+Down Arrow" key on the keyboard to create new record.
2. Type the adjustment date in the ‘Adjustment Date’ field.
3. Select Asset Code by pressing "Ctrl+L" or double clicking on ‘Asset Code’ field.
4. Select Adjustment Type – Sales of Asset/Auction
5. Add/Deduct field will be filled automatically (Deduct)
6. Now cursor will move on to ‘Sold To’ field, Type the name of the party.
7. Insert deduct quantity in ‘Quantity’ field.
8. Total cost of asset will automatically display in ‘Value’ field.
9. Total depreciation value of asset will automatically display in ‘Dep Upto Last Year’ field.
10. Type the Remarks as the requirement.
11. Select Sub Acc Code of Dr/Cr Account if nessecery.
12. Press "Ctrl+S" to save the record.
13. Open the "Post Voucher to CAS" form to post the voucher to CAS (Centralized Accounting System)
Transfer of Asset:
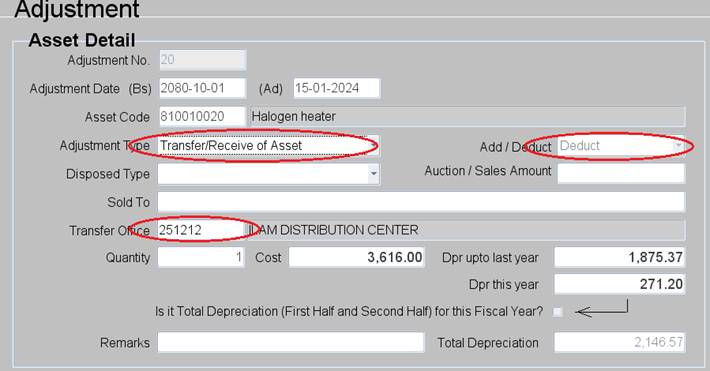
Transfer of Asset (Addition):
Note: Transfer of Asset (Addition) is not required to be entered by user. It is Automaticaly entered by the system through "InterUnit Recived" form.
Transfer of Asset (Deduction):
This form is used to transfer the Assets from your office to another office.
Steps
1. Press "Ctrl+Down Arrow" key on the keyboard to create new record.
2. Type the adjustment date in the ‘Adjustment Date’ field.
3. Select Asset Code by pressing "Ctrl+L" or double clicking on ‘Asset Code’ field.
4. Select Adjustment Type – Transfer of Asset.
5. ‘Add/Deduct’ field will be filled automatically (Deduct)
6. Now cursor will move on to ‘Transfer Office Code’ field, Select Office Code by pressing "Ctrl+L" or double clicking Office Code.
7. Insert deducted quantity in ‘Quantity’ field.
8. Total cost of asset will automatically display in ‘Value’ field.
9. Total depreciation value of asset will automatically display in ‘Dep Upto Last Year’ field.
10. Type the Remarks as the requirement.
11. Select Sub Acc Code of Dr/Cr Account if nessecery.
12. Press "Ctrl+S" to save the record.
13. Open the "Post Voucher to CAS" form to post the voucher to CAS (Centralized Accounting System)
Dispose/Write Off of Asset:
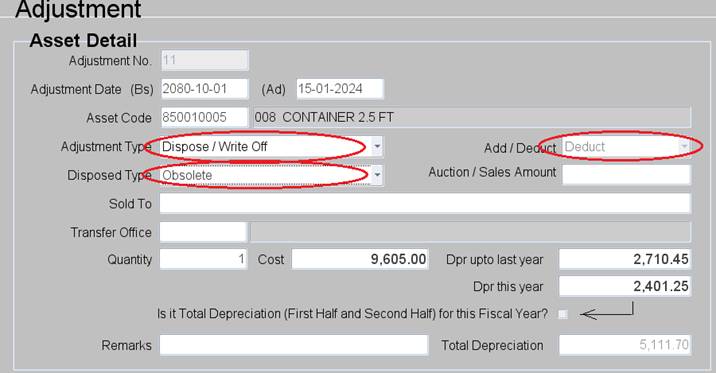
Steps
1. Press "Ctrl+Down Arrow" key on the keyboard to create new record.
2. Type the adjustment date in the ‘Adjustment Date’ field.
3. Select Asset Code by pressing "Ctrl+L" or double clicking on ‘Asset Code’ field.
4. Select Adjustment Type – Dispose
5. Add/Deduct field will be filled automatically (Deduct)
6. Now cursor will move on to ‘Disposed Type’ field, Select the option as requirement.
7. Insert deduct quantity in ‘Quantity’ field.
8. Total cost of asset will automatically display in ‘Value’ field.
9. Total depreciation value of asset will automatically display in ‘Dep Upto Last Year’ field.
10. Type the Remarks as the requirement.
11. Select Sub Acc Code of Dr/Cr Account if nessecery.
12. Press "Ctrl+S" to save the record.
13. Open the "Post Voucher to CAS" form to post the voucher to CAS (Centralized Accounting System)
– This menu is consists of two submenues.
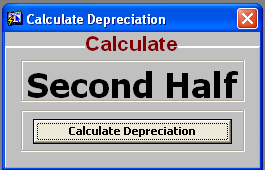
ii. Calculate Second Half / Final
i. Calculate First Half: This menu displays the ‘Calculate First Half’ depreciation form. This form is used to calculate depreciation during Shrawan to Poush.
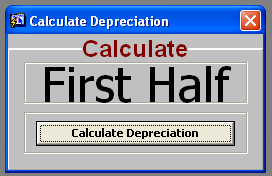
Steps
When the form appears on the screen, click on the button “Calculate Depreciation”.
ii. Calculate Second Half / Final: This menu displays the ‘Calculate Second Half / Final’ form. This form is to calculate depreciation during Magh to Ashar.
Steps
When the form appears on the screen, click on the button “Calculate Depreciation”.
– This menu is consisting of two submenues.
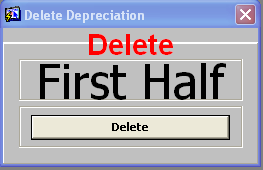
I. Delete First Half
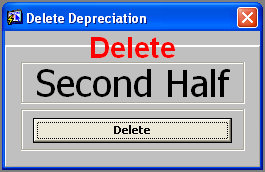
II. Delete Second Half / Final
I. Delete First Half: This menu displays the ‘Delete First Half’ depreciation form. This form is used to delete depreciation during Shrawan to Poush.
Steps
When the form appears on the screen, click on the button “Delete”.
II. Delete Second Half / Final: This menu displays the ‘Delete Second Half / Final’ form. This form is to delete depreciation during Magh to Ashar.
Steps
When the form appears on the screen, click on the button “Delete”.
This menu displays the "Post Voucher to CAS" form. This form is used to post the vouchers to CAS (Centralized Accounting System).
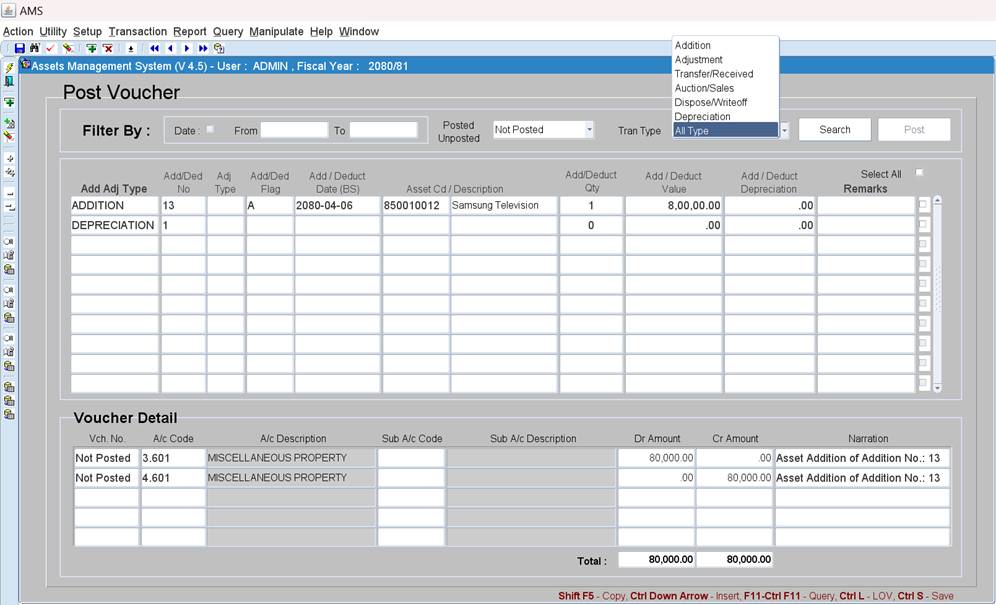
In this form there are several Filter option on the top.
I. Filter By: Date From and Date To - This Filter option displays all the records between the From and To Date provided.
II. Filter By: Posted Unposted (Posted) - This Filter option displays all the voucher detail that are already posted to CAS.
III. Filter By: Posted Unposted (Unposted) - This Filter option displays all the voucher detail that are to be posted to CAS.
IV. Filter By: Tran Type (Addition) - This Filter option displays all the voucher detail that are related to Addition of Asset.
V. Filter By: Tran Type (Adjustment) - This Filter option displays all the voucher detail that are related to Adjustment of Asset.
VI. Filter By: Tran Type (Transfer/Received) - This Filter option displays all the voucher detail that are related to Transfer of Asset.
VII. Filter By: Tran Type (Auction/Sales) - This Filter option displays all the voucher detail that are related to Auction/Sales of Asset.
VIII. Filter By: Tran Type (Dispose/Write Off) - This Filter option displays all the voucher detail that are related to Dispose/Write Off of Asset.
IX. Filter By: Tran Type (Depreciation) - This Filter option displays all the voucher detail that are related to First Half & Second Half Depreciation.
X. Filter By: Tran Type (All) - This Filter option displays the voucher detail of all Transaction Types (Addition,Adjustment,Transfer,Depreciation)
Setps to Post the Voucher to CAS.
1. Select "Unposted" option in "Posted Unposted" Dropdown Menu.
2. Select required Transaction Type (Addition, Adjustment, Auction/Sales, Dispose/Write Off, Depreciation) in "Tran Type" Dropdown Menu.
3. Select
the Voucher that is to be posted to CAS. ![]()
4. Click on "Post" Button.
5. The Confomation Dialogbox will appear. Press "Yes" to Post and "No" to Cancel.
Setps to Send InterUnit Voucher to Corrosponding Office.
1. Select "Unposted" option in "Posted Unposted" Dropdown Menu.
2. Select "Transfer/ Receive" option in "Tran Type" Dropdown Menu.
3. Select
the Voucher that is to be Send to corresponding office. ![]()
4. Click on "Send IU" Button.
5. The Confomation Dialogbox will appear. Press "Yes" to Send and "No" to Cancel.
Once the above process is complete the detail of InterUnit transaction is shifted to "InterUnit in Transit". To view the details, Select "IU in Transit" option in "Posted Unposted" Dropdown Menu.
(Note: InterUnit Voucher will not be posted to CAS unitil the Receiving Office Accepts the Transaction through "InterUnit Received". It will be in the state of 'InterUnit in Transit'.)
This menu displays the "InterUnit Received" form. This form is used to Accept the InterUnit Vouchers and post the vouchers to CAS (Centralized Accounting System).
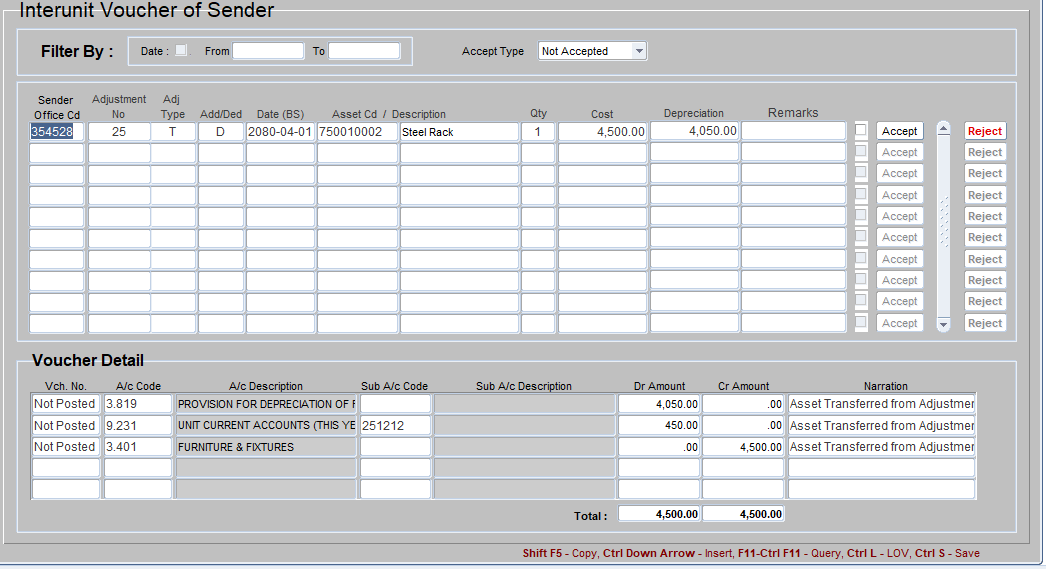
In this form there is a Filter option on the top.
I. Filter By: Date From and Date To - This Filter option displays all the records between the From and To Date provided.
II. Filter By: Accept Type (Accepted) - This Filter option displays all the InterUnit voucher that are already Accepted.
III. Filter By: Accept Type (Not Accepted) - This Filter option displays all the InterUnit voucher that are to be Accepted.
IV. Filter By: Accept Type (All) - This Filter option displays all the InterUnit voucher that are Accepted and that are to be Accepted.
There are some more options in Voucher Master block.
I. Reject Button: When this button is clicked the selected voucher will be rejected and the voucher detail will be transferred back to the sender.
II. Accept Button: When this button is clicked the selected voucher will be posted the CAS (Centralized Accounting System) and all the required posting will be done in AMS too.
Setps to Reject InterUnit Voucher
1. Select "Not Accepted" option in "Accept Type" Dropdown Menu.
2. Select
the Voucher that is to be Rejected. ![]()
3. Click on "Reject" Button.
4. The Confomation Dialogbox will appear. Press "Yes" to Reject and "No" to Cancel.
Note: Be very careful before rejecting the InterUnit Voucher as it will affect the transaction of sender.
Setps to Accept InterUnit Voucher
1. Select "Not Accepted" option in "Accept Type" Dropdown Menu.
2. Select
the Voucher that is to be Accept. ![]()
3. Click on "Accept" Button.
4. The Confomation Dialogbox will appear. Press "Yes" to Accept and "No" to Cancel.
5. If "Yes" option is selected the new "Accept InterUnit" form is displayed.
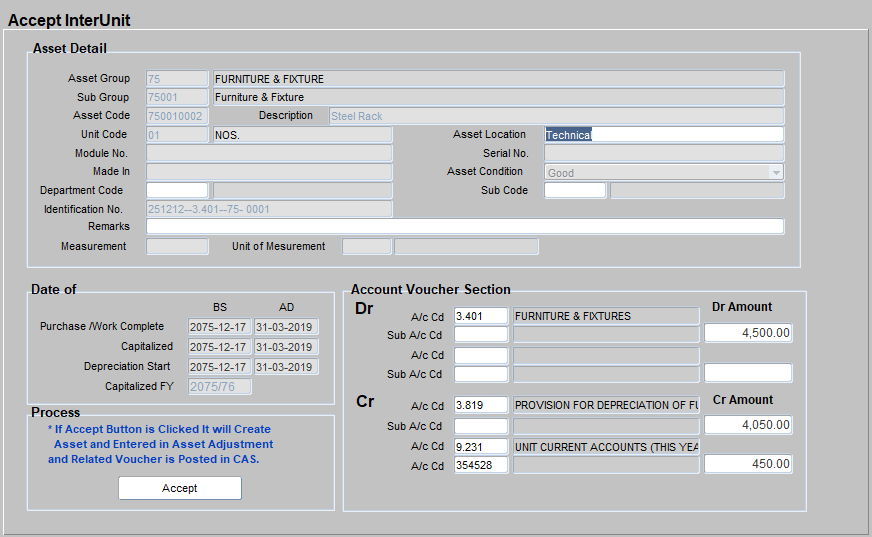
6. All the detail of Asset are posted in the related fields except Asset Location, Department Code and Sub Code.
7. Type the location of Asset in "Asset Location" field.
8. Select Department in the "Departemnt Code" field by pressing "Ctrl+L" or double clicking on "Department Code" Field.
9. Select Sub Code in the "Sub Code" field by pressing "Ctrl+L" or double clicking on "Sub Code" Field.
10. Select Dr/Cr Sub A/c Codes in "Account Voucher Section" if required.
11. Click on "Accept" Button after completing the required fields.
12. The Confomation Dialogbox will appear. Press "Yes" to Accept the InterUnit Voucher and "No" to Cancel.
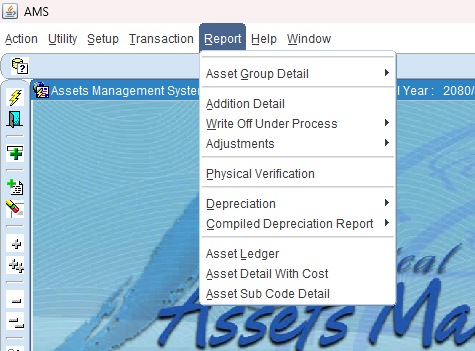
There are five sub menus under Report Menu.
1. Data Received
2. Asset Group Detail
3. Addition Detail
4. Write Off Under Process
5. Adjustments
6. Physical Verification
7. Depreciation
8. Compiled Deprecaiton Report
9. Asset Ledger
10. Asset Detail With Cost
11. Asset Sub Code Detail
1 Data Received – This menu is consists of two sub menu
i. Data Sending Offices
ii. Data Not Sending Offices
I. Data Sending Offices: When this menu is select the following dialog box will appear on the screen.
- Fiscal Year: Select Fiscal Year to view the respective fiscal year.
- Click on Report Button.
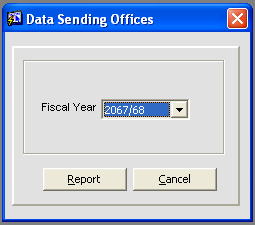
The following report will appear.

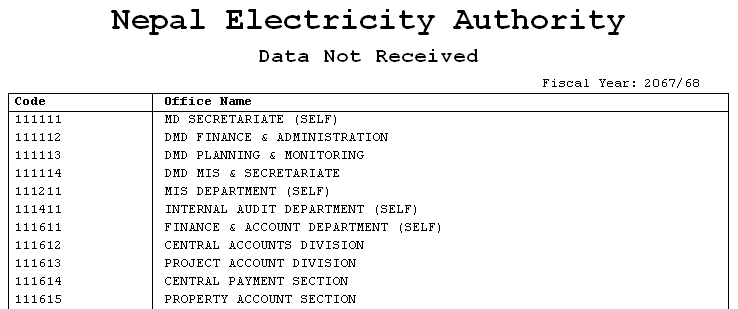
II. Data Not Sending Offices: When this menu is select the following dialog box will appear on the screen.
- Fiscal Year: Select Fiscal Year to view the respective fiscal year.
- Click on Report Button.
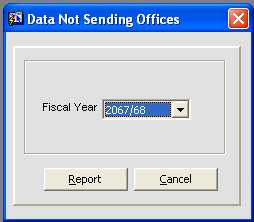
The following report will appear.
2 Asset Group Detail – This menu is consists of four sub menu
i. Asset Opening Grop Wise
ii. Asset Opening Detail
iii. Asset Group Report
iv. Asset Detail Report
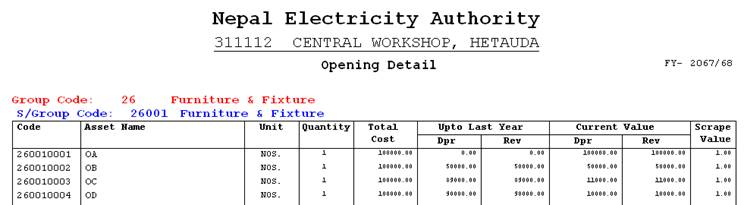
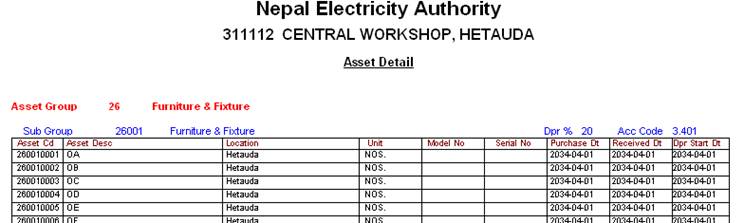
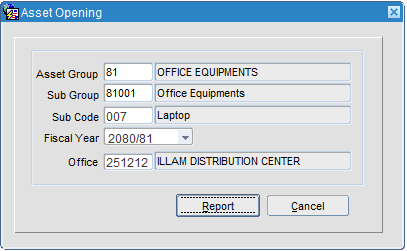
i. Asset Opening Group Wise: When this menu is selected the following dialog box will appear on the screen.
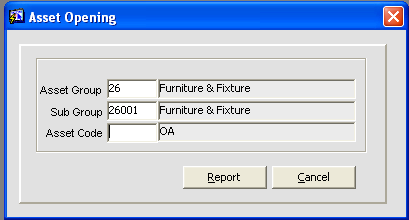
- Asset Group: Select Asset Group Code by pressing "Ctrl+L" or Double click.
- Sub Group: Select Sub Group Code by pressing "Ctrl+L" or Double click.
- Asset Code: Select Asset Code by pressing "Ctrl+L" or Double Click.
- Click on Report Button.
Note: If Asset Group, Sub Group and Asset Code is not selected, then whole report will be displayed.
The following report will appear.
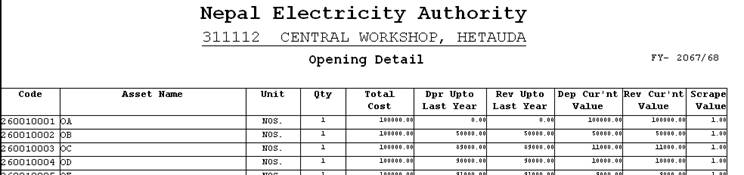
ii. Asset Opening Detail: When this menu is selected the following dialog box will appear on the screen.
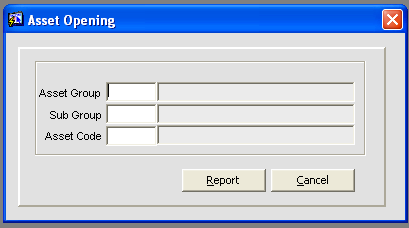
- Asset Group: Select Asset Group Code by pressing "Ctrl+L" or Double click.
- Sub Group: Select Sub Group Code by pressing "Ctrl+L" or Double click.
- Asset Code: Select Asset Code by pressing "Ctrl+L" or Double Click.
- Click on Report Button.
Note: If Asset Group, Sub Group and Asset Code is not selected, then whole report will be displayed.
The following report will appear.
iii. Asset Group Report: When this menu is selected the following dialog box will appear on the screen.
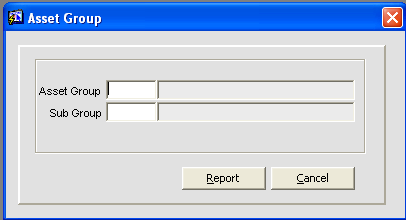
- Asset Group: Select Asset Group code by pressing "Ctrl+L" key or double click.
- Sub Group : Select Sub Group code by pressing "Ctrl+L" key or double click.
Note: If Asset Group, Sub Group and Asset Code is not selected, then whole report will be displayed.
iv. Asset Detail Report: When this menu is selected the following dialog box will appear on the screen.
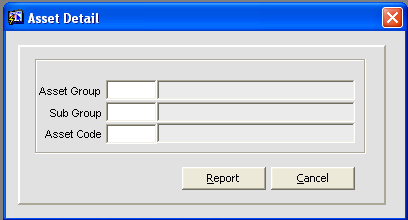
- Asset Group: Select Asset Group Code by pressing "Ctrl+L" or Double click.
- Sub Group: Select Sub Group Code by pressing "Ctrl+L" or Double click.
- Asset Code: Select Asset Code by pressing "Ctrl+L" or Double Click.
- Click on Report Button.
Note: If Asset Group, Sub Group and Asset Code is not selected, then whole report will be displayed.
The following report will appear.
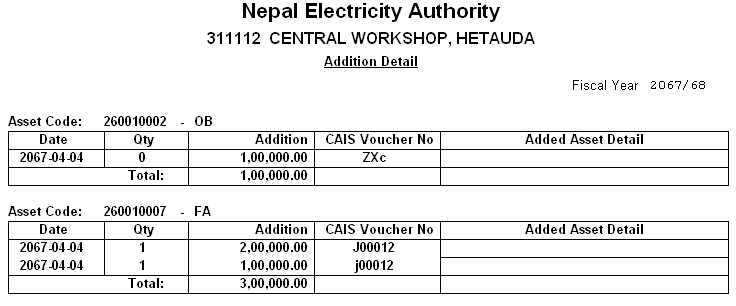
3 Addition Detail – When this menu is selected the following report will appear on the screen. This report displayes all the addition done during the fiscal year.
4 Adjustments: This menu consists of two more sub menus.
1. Adjustment Detail (Item Wise)
2. Adjustment Detail (Type Wise)
3. Adjustment Detail (Transfer Detail)
4. Transfer Note
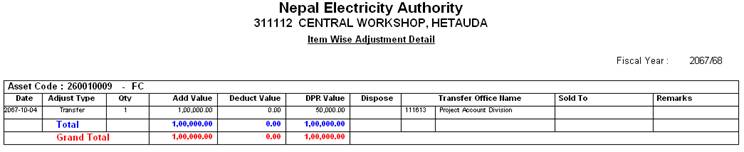
- Adjustment Detail (Item Wise): When this sub menu is selected the following dialog box will appear on the screen
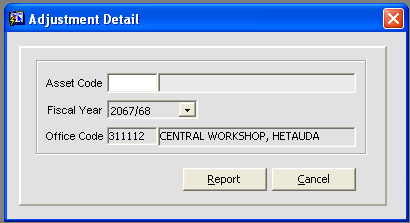
- Asset Code: Select Asset Code by pressing "Ctrl+L" or Double click.
- Fiscal Year: Select the fiscal year as your requirement.
- Office Code: It is the Office Code for your office. (no need to select)
- Click on Report Button.
Note: If Asset Code is not selected, then whole report will be displayed.
The following report will appear.
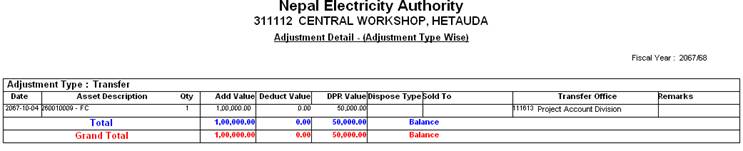
- Adjustment Detail (Type Wise): When this sub menu is selected the following dialog box will appear on the screen
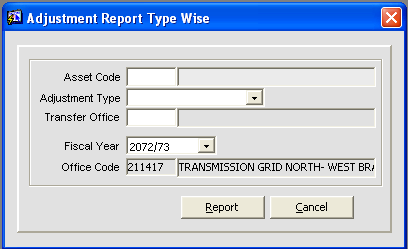
- Asset Code: Select Asset Code by pressing "Ctrl+L" or Double click.
- Adjustment Type: Select the adjustment type as required.
- Transfer Office: Select the transfer office by "Ctrl+L" or Double click if required.
- Fiscal Year: Select the fiscal year as your requirement.
- Office Code: It is the Office Code for your office. (no need to select, bydefault it will be your office code)
- Click on Report Button.
Note: If Asset Code is not selected, then whole report will be displayed.
The following report will appear.
- Adjustment Detail (Transfer Detail): When this sub menu is selected the following dialog box will appear on the screen
- Asset Code: Select Asset Code by pressing "Ctrl+L" or Double click.
- Adjustment Type: Select the adjustment type as required.
- Transfer Office: Select the transfer office by "Ctrl+L" or Double click if required.
- Fiscal Year: Select the fiscal year as your requirement.
- Office Code: It is the Office Code for your office. (no need to select, bydefault it will be your office code)
- Click on Report Button.
Note: If Asset Code is not selected, then whole report will be displayed.
The following report will appear.
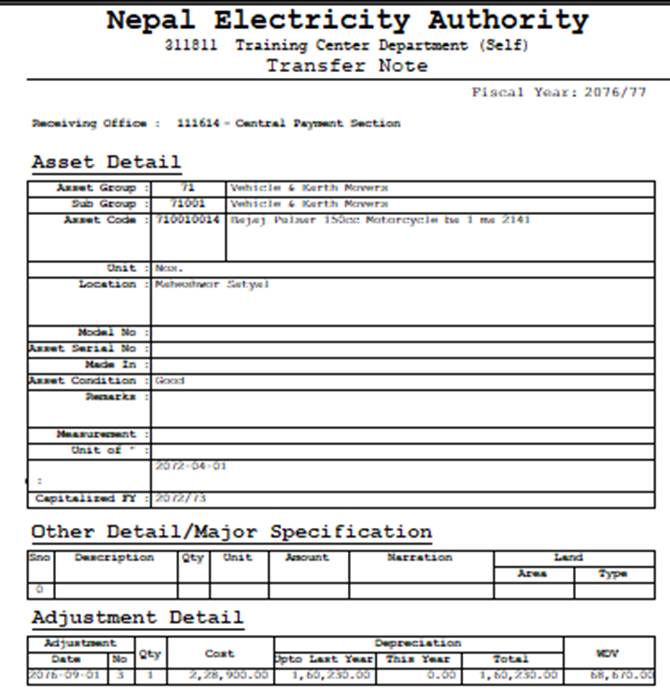
- Transfer Note - When this sub menu is selected the following dialog box will appear on the screen
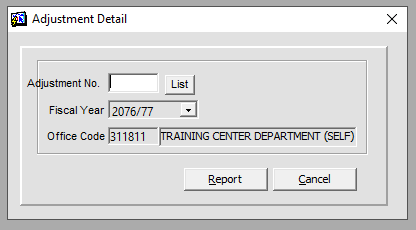
- Adjustment No.: Select Adjustment Number by pressing "Ctrl+L" or Double click or Click on List Buttorn.
- Fiscal Year: Select the fiscal year as your requirement.
- Office Code: It is the Office Code for your office. (no need to select, bydefault it will be your office code)
- Click on Report Button.
The following report will appear.
Note: This report must be sent to the Receiving Office for the verification purposr.
5 Depreciation: This menu consists of three more sub menus.
1 First Half
2 Final Depreciation
1 First Half: This menu contains four sub menus.
Depreciation Detail (First Half)
Subgroup Summary (First Half)
Groupwise Summary (First Half)
Voucher Preview (First Half)
CAS vs AMS
View the report as requirement.
2 Final Depreciation: This menu contains four sub menus.
Depreciation Detail (Final)
Subgroup Summary (Final)
Groupwise Summary (Final)
Voucher preview (Final)
CAS vs AMS
View the report as requirement.
6 Compiled Depreciation Report: This menu consists of six more sub menus.
1 Groupwise Summary - First Half - Compiled - This report is used to view the Groupwise Summary of the Compiled Depreciaton Report up to the month of Poush.
2 Groupwise Summary - Final - Compiled - This report is used to view the Groupwise Summary of the Compiled Depreciaton Report up to the month of Ashad.
3 Total Summary - Final - Compiled - This report is used to view the Total Summary of the Compiled Depreciaton Report up to the month of Ashad.
4 CAS vs AMS Aggregate - Final - This Aggregare report is used to view the comparision between CAS (Centralized Accounting System) and AMS of whole NEA.
5 CAS vs AMS Summary - Final - This Summary report is used to view the comparision between CAS (Centralized Accounting System) and AMS of whole NEA.
6 CAS vs AMS Detail - Final - This Detail report is used to view the comparision between CAS (Centralized Accounting System) and AMS of whole NEA.
View the report as requirement.
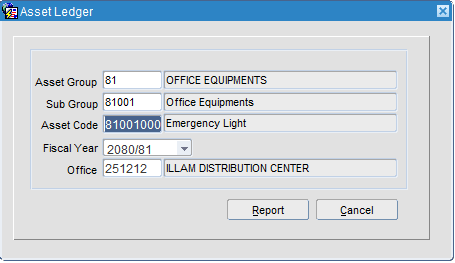
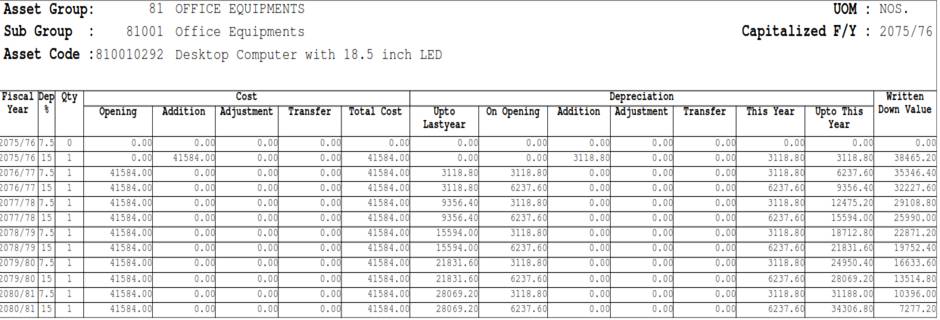
7 Asset Ledger: This report is used to view the detailed ledger of a particular Asset.
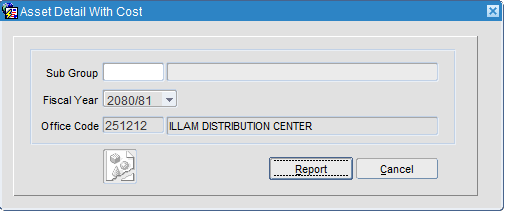
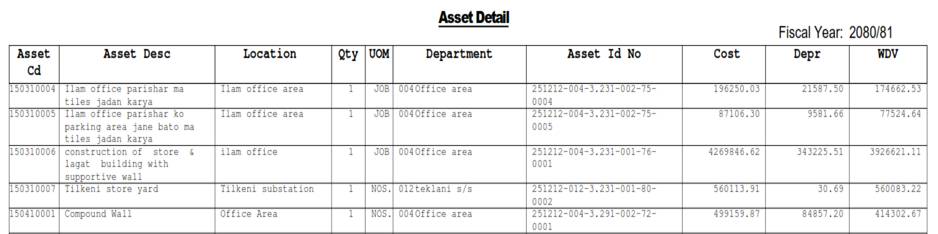
8 Asset Detail with Cost: This report is used to view the Asset detail with Cost of a particular Asset.
9 Asset Sub Code Detail: This menu consists of six more sub menus.


There are two sub menus under Help Menu.
1. What Happened
2. User Manual
1 What Happened – If you face any kind of technical issues during the software operation then go to Help menu and Click on ’What Happened’ menu.
Then the following Dialog Box will appear.
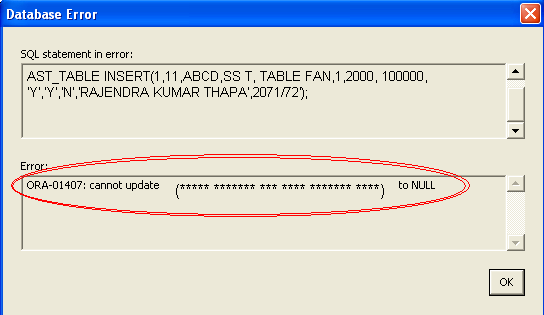
Provide the Error Code (ORA-01407***) to the team System Administrator
6. User Manual – This menu displays the AMS's User Manual.
********** THE END **********